


Carrying on from my series on the basics of embroidery, it’s time to talk about another staple – the hoop. If we’re being really picky, some might say it’s not a total essential because, technically, you can just hold your fabric and sew onto it. I can assure you, though, that having a hoop makes embroidery so much easier! I’ve already touched on a few key points in my Ultimate Embroidery Guide for Beginners post, but I wanted to take some time to go into more detail, because there’s more to the selection process than you might think.
What is an Embroidery Hoop?
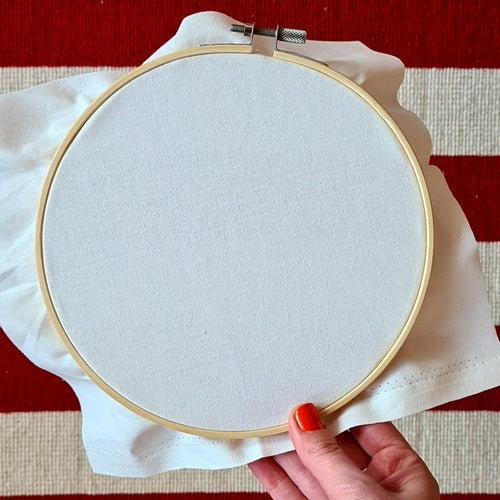
Let’s start with the most fundamental point - what actually is an embroidery hoop?! Well, it’s basically a frame that will help you while you work. Regardless of material, pretty much every embroidery hoop you come across will be made up of two key parts – an inner and an outer circle. The idea is to sandwich your fabric between the two parts so that it’s pulled nice and taught. The tension will make all the difference when it comes to stitching your design and the sturdy frame also gives you something to hold onto. Now that we know what we’re dealing with on a basic level, let’s delve further into the top things to consider when choosing your hoop.What's the Purpose of your Hoop?
So, I know I just explained the basic purpose of a hoop, but it actually goes a little further than that. Hoops have two purposes - working and display.Working Hoop
For the stitching phase of any embroidery project, you’ll want to start with what’s referred to as a working hoop. This means its sole purpose is to hold your fabric.
The main functional aspect to look out for is the ability to tighten and loosen the hoop in order to hold your fabric properly taught during the embroidery process. The most common type of adjustable working hoop is made from a flexible wood, often bamboo, and has a screw fitting. This is the type that I tend to work with and that I provide with my embroidery kits.
An alternative option is a spring tension hoop. These typically have a plastic outer frame and a metal inner hoop with two handles. You just have to squeeze the two handles together to make the inner circle smaller, fit your fabric between the two hoops as you would with a wooden option, then release the handles. The inner hoop will slot tightly into the outer hoop and pull the fabric taught. In terms of which is better, it really just comes down to personal preference.

Display Hoop
You’ll also want to consider what’s known as your display hoop, meaning the one you’re going to showcase your finished design in.
Many people find their working hoops to be perfectly suitable as their display hoop, especially if they’re the basic wooden ones. Others keep the same frame but decide to customise them with paint or fabric wraps. It’s such an easy update idea and, since the hoops are adjustable, you can get creative without worrying that your final piece won’t fit afterwards!
Other embroiderers prefer to buy a more decorative or unique hoop to display their final piece. I personally love to switch my hoop to one with a hanging loop rather than the adjustable screw. Banner holders are another brilliant way to display your piece if you don’t want the classic circle. I have both of these options in my online embroidery shop if they sound up your street!
If you’re not sure on what you want for your end result, I recommend just getting started with a basic working hoop. You can always figure out your desired display look further down the line. Don’t let frame design decisions get in the way of the actual stitching!

Which size is right?
Whether your hoop is for work, display, or both, you’ll need to think about which size to choose. This will partly come down to preference – some people prefer to hold a larger hoop; others prefer something smaller. If you’re just stitching something tiny and detailed, you might not necessarily want or need to have a huge hoop. Alternatively, you might be stitching something on a large scale and prefer to have a smaller hoop that you can just move around the piece as you go. Bear in mind that this will leave circular marks, but that’s nothing that a quick iron over shouldn’t be able to sort out.
One thing you definitely want to be sure about, though, is that your display hoop is big enough to hold the whole design!

What type of material?
Next up to consider when choosing an embroidery hoop is the material that it’s made from. As I mentioned briefly earlier, most basic hoops are wooden. The cheapest tend to be bamboo but beech is also popular.
When it comes to plastic hoops, you’ll find two main types – colourful ones, both screw tension and spring tension, that are typically used as working hoops, or flexi ones that tend to be used more for display purposes. I actually used to use flexi frames with a wood detail effect all the time but have recently stopped as part of my on-going efforts to make Paraffle as sustainable and environmentally friendly as possible.
Finally, you can also get vintage metal hoops. They’re not very common – more something to track down on eBay or have a rummage for at a car boot sale – but they’re a gorgeous option if you can find them! I love the idea of bringing new life to an old item like that with a modern design.
What shape do you want?
This will mainly be of concern for your display hoop decisions. Circles are by far the most common, but you can also find ovals, octagons and round-edged squares pretty easily in most haberdasheries or online. These are such a fun way to add something extra to your final piece, just make sure your design will fit!
Some people prefer to use photo frames to showcase their final designs, which can look amazing. In this case, you can totally just stick to a basic circular hoop while you work.
How do you want to hold your hoop?
One last thing you might want to think about is how you’ll be holding your hoop. Whether you go for a classic circle or decide to switch things up with an oval from the get-go, you’ll most likely be holding your hoop in your hand. As I touched on before, just be sure that you’ve chosen a size that you feel comfortable with.
But there’s also another way to steady your hoop – an embroidery hoop stand! I’ve personally made the switch to using one on the reg and, honestly, it’s been a total game changer! As I’m usually stitching either in my studio or at home, I have plenty of space to pop the stand up. It’s so brilliant to have both hands free to sew rather than having one always holding the hoop. Once again, size of hoop comes into play here – if you’ve got something tiny, it’s going to be quickly covered up by the stand clamp, leaving you with little room for stitching. Another point worth making is that, obviously, this isn’t such a practical option if you like to fit your sewing sessions in when you’re on public transport, for example. I highly recommend it to anyone who has the space, though.
A final option is to totally forego your hoop and use a scroll frame. Much like the hoop stand, these give you more freedom of movement and can be adjusted for maximum comfort. These frames tend to be square or rectangular and will hold your fabric at the top and bottom, rather than encasing it in a circle. You’ll still have to make the same decision about your final display look, but this takes out any need for a working hoop.

I feel like there’s pretty much no right or wrong answer when it comes to choosing your embroidery hoop – so much of it comes down to personal preference and comfort. Take these suggestions as guidelines to consider, but don’t overthink it. The most important thing is to just have fun with your project. And if you get started and think that something about your hoop isn’t quite right, you can easily switch it up for a different one or adapt your project accordingly. Embroidery is all about being creative after all!
If you feel ready to get going with a hoop choice, feel free to check out the options in my online embroidery shop. Or if you have any questions, let me know below!


